
The last step to completing your campaign is scheduling it to go out. Once that is finalized, you can sit back as our system automatically sends the emails out for you. All you have to do is wait to see the results and make any necessary adjustments before sending out your next one.
Follow these easy steps to get this done quickly. You can also download the Email Campaign Creation Guide for free for more information.

Scheduling the campaign is where you set the day and time for your email campaign to begin. It also determines which contacts the campaign will be applied to.
You can first perform a lookup by going to Contacts > Create Lookup. Once you have the list you want, click the Make this My Lookup button on the search results page.
Now go to Campaigns > Add to Campaign. Then, follow these steps:
- Select the campaign by typing its name in the search bar at top.
- Select the Start Date. This starts 0 days after the start date will be scheduled. All other steps will be scheduled as Start Date + # of days after the start date.
- Select the time. Mornings are generally best for B2B.
- Choose which contacts will be added to this campaign.\
- Lookup (#) – if you’ve performed a lookup previously, this will select that list to add to the campaign.
- Current Contact – this will add only the contact you were viewing prior to selecting Add to Campaign.
- Group – you can choose a previously created group of contacts.
- Double check everything! You can click the VIEW button next to the email template names to check that template to be sure it’s perfect.
- Click Add to Campaign.
- Click Yes – the system gives you a confirmation notice and one last chance to abort the process.
That’s it! Your campaign is scheduled and the emails will be sent automatically on the schedule date(s).
Any calls or todo’s will appear on the task list of the appropriate user.
Measure and Optimize
Set goals for your campaign so you have a measuring stick to compare to.
First, be sure your expectations are realistic. Here are the general Email Marketing benchmarks to expect:

- Open Rate: 10 to 20% of the original list sent to.
- Click Rate: 1 to 2% of the original list sent to.
- Conversions: (meaning form submissions on your site) 5 to 20% of the clicks.
How Many Conversations?
“Connection” rates will be similar to those you see in your general calling efforts to your audience or customers. If you’re calling clickers AND you’re calling them quickly, you should expect connection rates to improve by 25 to 50%.
Make sure you’ve planned out exactly how your team will designate that a call was made and what the results were.
How Many Qualified Opportunities?
Of course, this will depend entirely on your audience and your offer but, for starters assume you’ll achieve a similar rate to your other most common marketing tactics.
Be sure you’ve planned out HOW you’ll identify the qualified leads or opportunities that came from your email campaign.
Measuring in SalesNexus
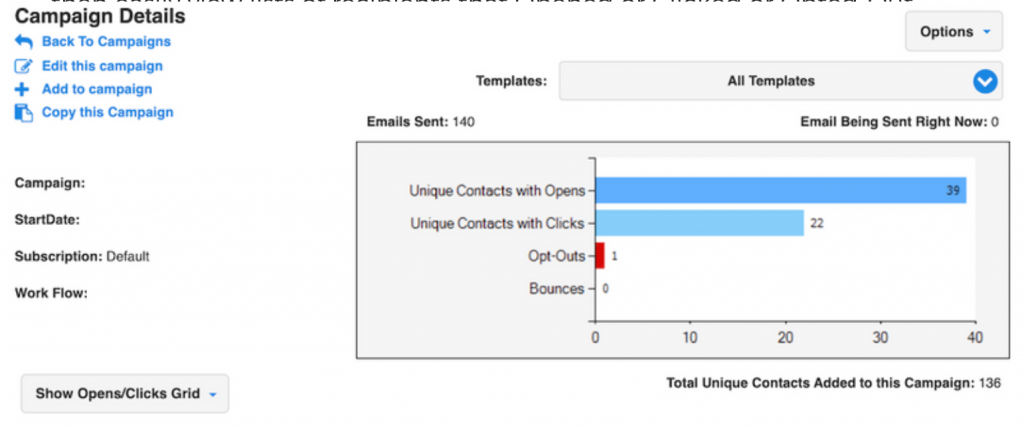
It’s easy to measure Opens and Clicks in SalesNexus by going to View Campaigns.
Once you’ve drilled into the analytics for a specific campaign, you can then easily view lists of recipients that Opened or Clicked or Opted-Out and then take those lists and perform additional analysis.
So, a simple way to track all of the metrics above is to designate one field in SalesNexus where your team will designate the disposition of the lead once they’ve talked to them. That way you can easily grab the list of clickers and then sort it by the disposition field, sales rep, etc.
If you’re goal is to get readers to fill out a form on your site, connect the form to SalesNexus using the Lead Capture feature and when the form is submitted, SalesNexus will update the existing contact already in SalesNexus (matching by email address) and you’ll be able to track clicks, form submissions and disposition.
Optimizing
If you’re measuring the process as above, making adjustments to improve results is simple.
Open Rate – Benchmark is 10 to 20%. If it’s lower, then try a different subject line.
Click Rate – Benchmark is 1 to 2% (of the entire list sent to, or 10% of the opens) – if it’s lower, then your email did not resonate with the audience.
Some things to consider:
If your open rate was low, then the click rate can be statistically insignificant
Don’t get too worried about the email itself yet.
Most often, a low click rate means you failed to get the message across to the audience quickly enough.
In the 2 or 3 seconds they took to glance at your email, they couldn’t see a reason to click. Try to make it shorter and emphasize how the reader will benefit from the content.
Your subject line may be attracting people for reasons that don’t align with the message in your email. In other words, when they open the email, they don’t see what the subject line led them to expect. It’s hard to know how readers will interpret your subject line so, sometimes it’s best to just rephrase things using different words.
Read additional tips on Writing Good Email Subject Lines here.
The problem may be with your list, not the emails. Depending on how you built your list, they just may not be in your sweet spot. If you’re able to subdivide your list into very specific groups based on industry, title, application of the product, etc. you can create campaigns that are more specific to each specific audience.
Download our Email Campaign Creation Guide for more details and examples on creating and sending out successful email campaigns.