The Tech You Need to Deliver Killer Virtual Presentations
When the pandemic hit, my entire sales training and coaching practice went virtual. I’m grateful that my clients feel my presentation style is fun and engaging. But to create the live experience I was after (not to mention an entire online Sales Academy program), flipping on my webcam, popping in some Airpods, and looking down at my laptop wasn’t going to cut it.
Like it or not, we live in an experience economy. That means, regardless of what you sell or who you sell it to, the experience your customers have with you IS your product!
And in a virtual selling environment, that experience not only starts with the quality of your technical setup but how you use it.
I’m ultimately very happy with the home studio I’ve created. And judging by reactions like, “Oh! How is your camera so clear?”, “How do you do those visual tricks with your slides?” and “How are you maintaining eye contact and not looking down?”, my clients are too!
But getting here was painful.
Because people ask me about it so often and I want to save you the pain I went through, here’s a digest of all the hardware and software technology I use to deliver engaging, online presentations.
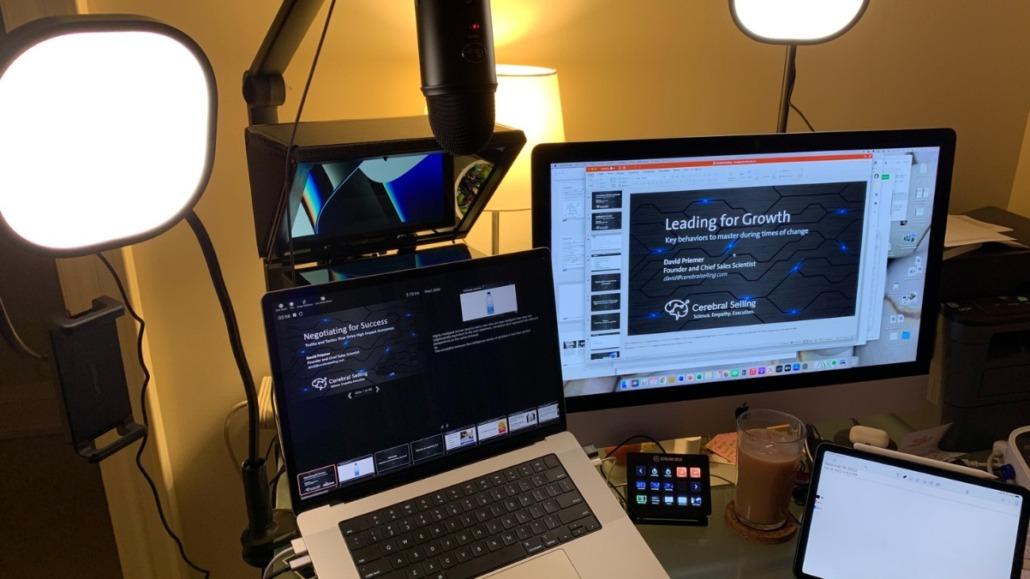
My home studio setup from behind the camera
Level 1 – The Basics
No matter what web conferencing software you use (i.e. Zoom, Google Meet, Microsoft Teams, etc.) at some point in customer conversation you’re going to want to share a presentation, your browser, or an application. Unfortunately, when you do that, whatever it is you share is going to take over the audience’s screen and relegate your face to a tiny postage stamp off to the side.
Not very engaging.
What’s even worse is that when you stop sharing or switch to a different view, the visual experience can be jarring for your audience. That’s why most people just stay in “share view” once they’re there, significantly impairing their ability to engage their participants.
These technologies will help you overcome this basic challenge!
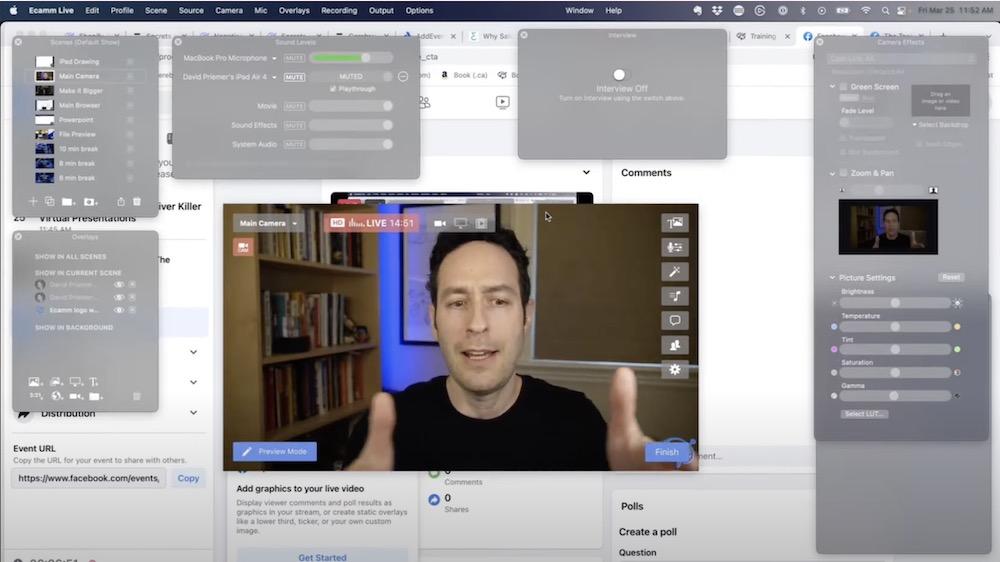
Ecamm Live (USD$32 /mo) – the beating software heart of your presentation tech stack! Among other killer features, Ecamm allows you to setup a seemingly unlimited “scenes” comprised of various input sources (like slides, devices, browsers, applications), camera views, and image overlays. It then pumps the visual out to a “virtual camera” which replaces your webcam in your video conferencing software. Switching between scenes allows you to create incredible visual interest on the fly without the need to activate your conferencing software’s sharing feature.
Note: Ecamm live is Mac only (sorry PC users) but a free alternative (for both Mac and PC) is OBS Studio. Although you can’t beat Ecamm for the amazing combination of simplicity and power.
Loopback (USD$99 /one-time) – in the same way Ecamm live combines multiple visual sources into a “virtual camera”, Loopback does the same for audio. For example, you can combine audio coming from your microphone, video conferencing software participants, and your favorite music app into a “virtual microphone” device that can act as the audio input for conferencing software. Here’s a post explaining how to get Loopback working with Ecamm and your favorite conferencing software.
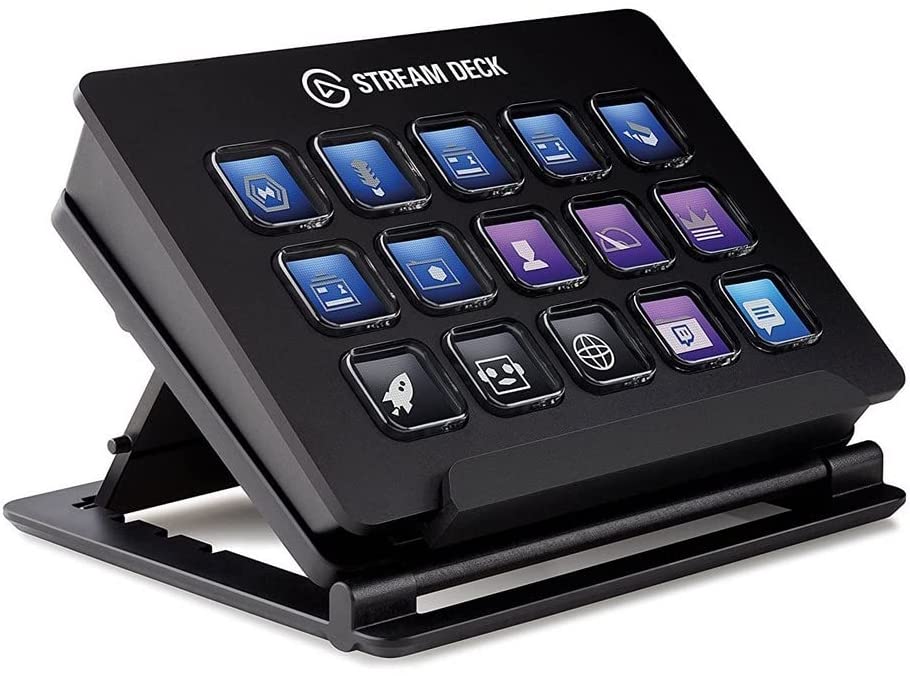
Elgato Stream Deck (US$150 for the 15-button version) – this super configurable hardware switchboard is incredible and would be super valuable even if you bought nothing else! But when used with Ecamm Live, it allows you to seamlessly switch between scenes with the push of a button. That means you can be full screen on camera one moment, switch to your slides with your face in a corner circle to illustrate your point, and then back to full camera view to drive your case home without ever needing to hit the share button once! The Stream Deck can also control virtually anything in this stack from lights, applications, slideshow movement, and almost anything else you can think of. I use it for TONS of things!


HDMI Dummy Dongle (US$9) – the cheapest piece of tech in the stack is also one of the most useful! Here’s the problem. You’re running a presentation and you want to share the slides with your audience. But if you’re running a single monitor (or laptop) setup, the presentation takes over your entire screen. That prevents you from taking notes on another application or running your slides in presenter view (so you can see your notes, upcoming slides, and quickly navigate between them if needed). Having a second monitor would solve the problem but it seems silly to have a whole other screen JUST to share out the audience’s view of your slides. Enter the HDMI dummy dongle!
Plug this little guy into any HDMI port on your laptop (or adapter dongle) and your computer will automatically recognize it as a spare monitor that doesn’t actually exist in real life. When you run your presentation, set the output to this virtual spare monitor, and share that output to your audience (or as part of a scene in Ecamm). Problem solved! You can even travel with it if you need to recreate this experience on the road.
Level 2 – Crystal Clear Audio and Video
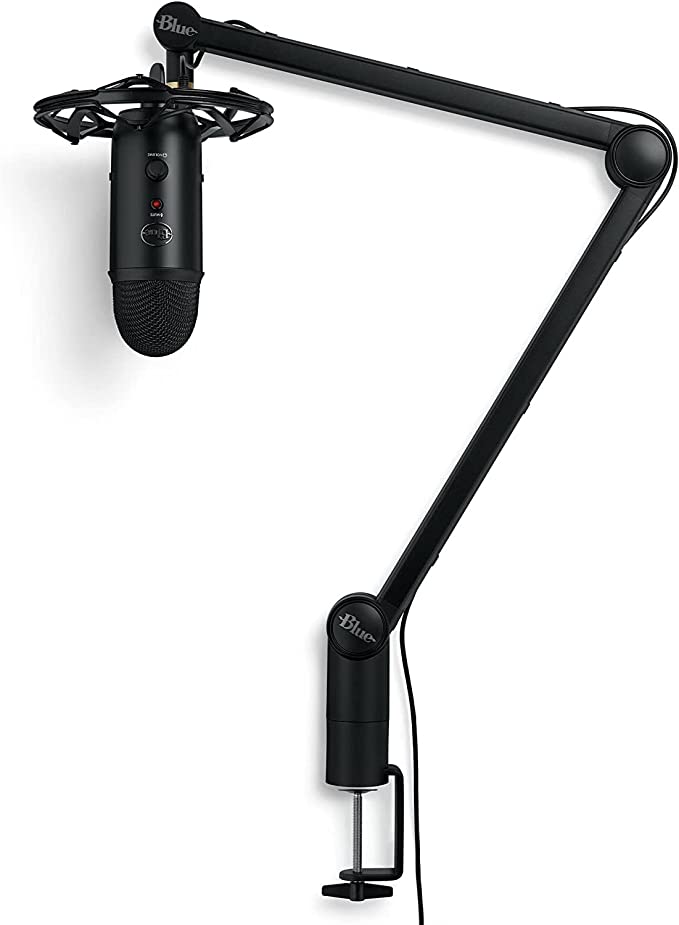
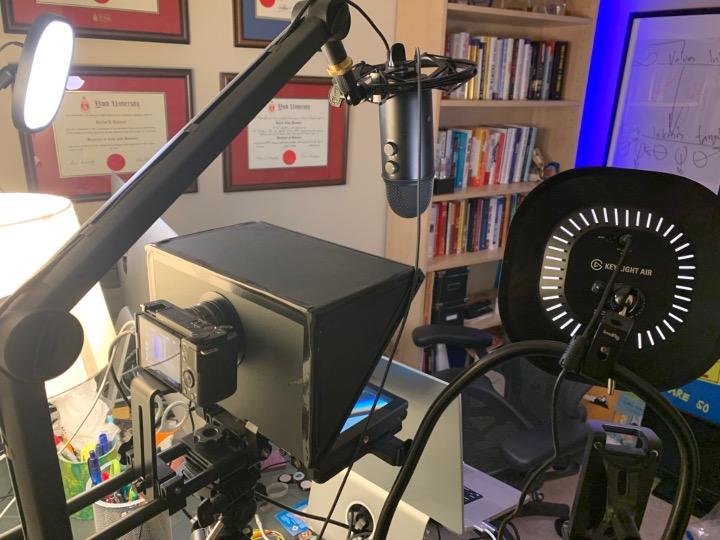
Microphone – Blue Yeticaster Pro Broadcast Bundle (US$175) – if you want super clear audio you need a proper microphone and the Blue Yeti is one of the most common mid-range (but excellent) options available. I like the setup with the boom arm because it allows you to suspend the microphone up and out of view and off your desk. The other useful feature of the microphone is the ability to plug headphones directly into it for audio monitoring (i.e. to hear yourself speaking). While a bit freaky at first, it’s helpful to hear exactly what your audience is hearing so you know if your audio is coming through at the right level.
Headphones: MEE audio Sport-Fi M6 w/Memory Wire (US$15) – I like using headphones to immerse myself in the sound from the meetings. These are good, inexpensive, and the clear plastic and reverse wrap-around format keeps them out of view from your audience. No messy wires to clutter the visual.
Note: depending on how far your audio jack is you might need an audio cable extension. I run a 6ft extension on mine.
Camera: Sony ZV-e10 (US$800) – If you want a killer camera experience that captures the most possible light and creates that cool blurred 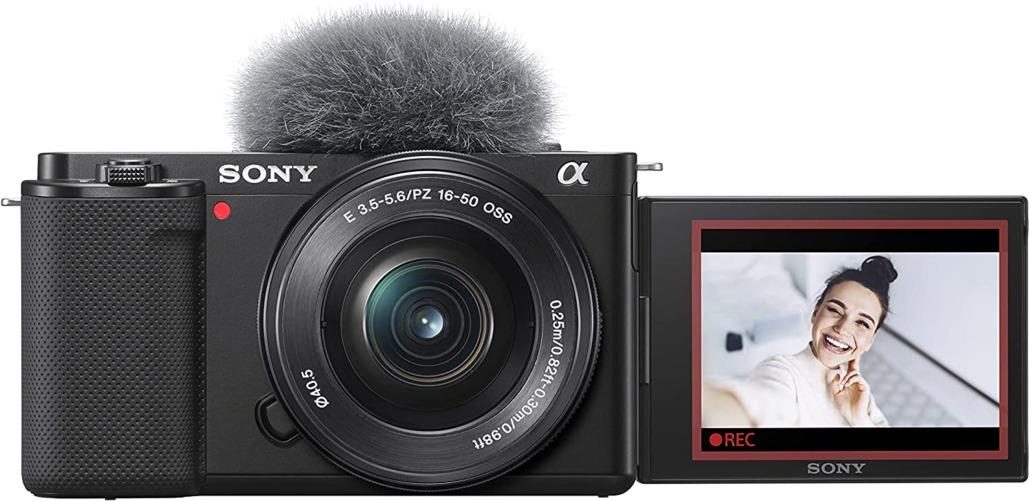 background effect natively, you have to ditch your built-in or external webcam and move up to a proper DSLR. This compact model is a favorite of vloggers and streamers alike because it’s small, easy to use, powerful, has a native webcam output mode and can be connected to external power for unlimited uptime.
The only problem is that even though it’s a 4K camera, its native video streaming mode (which connects to your computer via a USB-C cable) only outputs 720p. Hence, the next item on the list.
Elgato CamLink 4K (US$130) – now don’t freak out! I know. All that money for a stupid little dongle that connects your camera to your computer sounds like a waste (especially since I already told you the camera can connect without this via USB-C at 720p). But trust me, I did my research
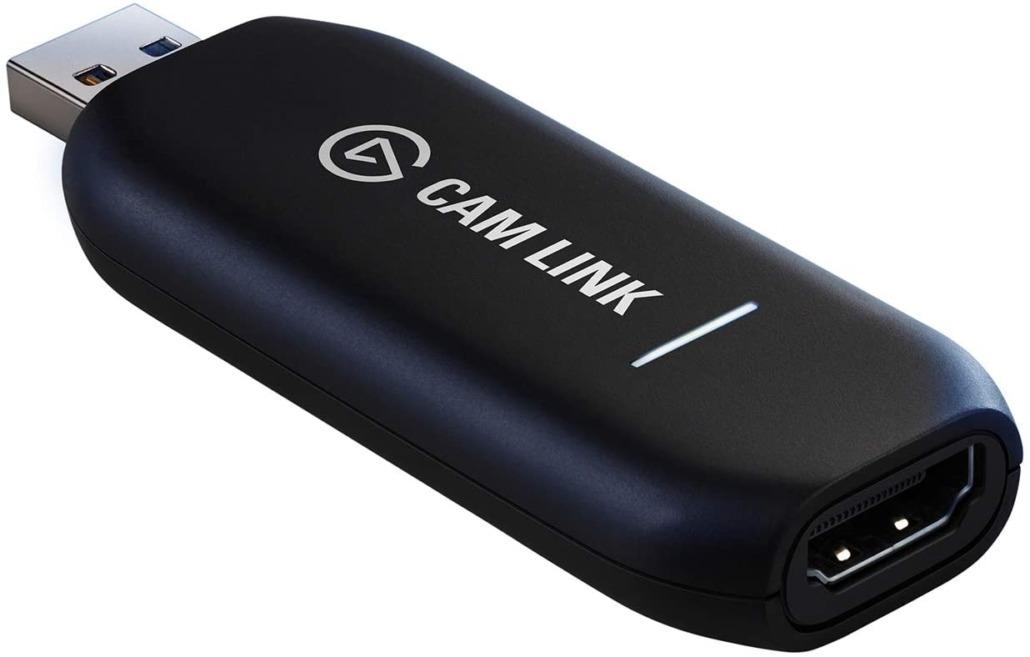
and you want this. This little dongle connects your 4K camera via an HDMI cable and pumps the signal into your computer at full 4K resolution and brilliant color! Don’t ask me how it does it. But heck, you’re already dropping all this money to have a killer setup, just close your eyes and click “buy” on this one.
Note: there are cheaper 4K capture dongles out there for sure. I just decided not to mess around here. But if you feel like trying something that’s more cost-effective, have at it!
Level 3 – Going Pro
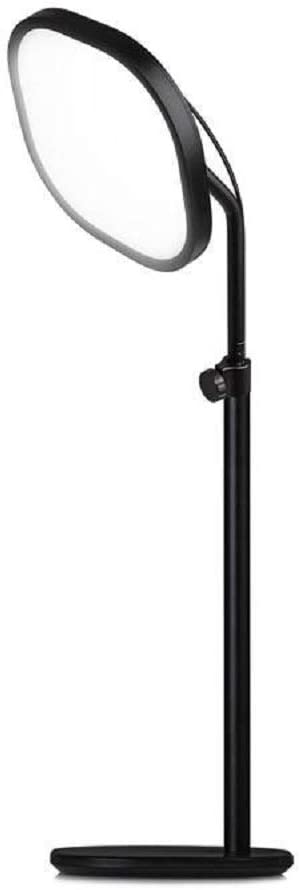
Elgato Key Light Air x 2 (US$115/each) – the lighting you use will obviously depend on what the setup of your room is. If you’re perched in front
of a bright window for most of the day, you may not need any external lighting. In my setup, I use two of wifi enabled Elgato Key Light Airs. They’re plenty bright (especially for smaller rooms), their power/hue can be controlled using included software, and you ca
n even manage the works using your Stream Deck! As with the CamLink, there are plenty of less expensive options out there. I wanted something proven, rock solid, and the same brand as the rest of the hardware to ensure I didn’t run into any compatibility issues.
Teleprompter Setup: one of the most powerful elements of any human interaction is being able to look at your audience in the eyes! Unfortunately, because most laptops and webcam setups have the camera positioned at a different elevation than the image of the other person, you always appear to be looking down or not directly at them. A teleprompter setup solves that problem!
The first component of this setup is the teleprompter rig itself which includes a tray, an angled mirror, and the ability to stage your camera in behind it. You’ll also need to purchase a small desktop tripod to attach the rig to. This allows you to put the camera at eye level and look straight into it, but because the mirror is placed in front of it, you’ll actually be looking at whatever screen it placed in the teleprompter tray. This is where you’ll want to put your conferencing window.
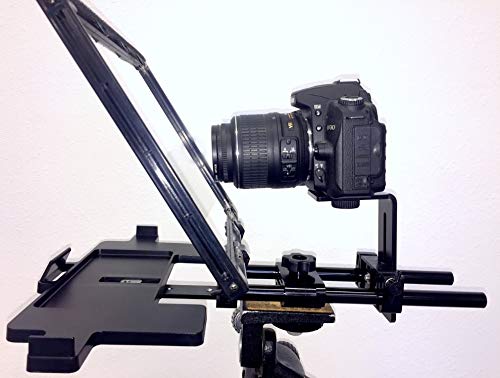
Caddy Buddy (USD$165) – Note: for some reason, this doesn’t appear on their website anymore but any similar product will do.
The question then becomes, what do you put in the tray to feed the image you’ll be looking at?
These trays are generally small and can only accommodate a small screen of about 12 inches or less. For this application you might consider using a spare iPad or small field monitor connected to your computer and configured as an extra screen but keep in mind, whatever image appears on the screen will actually be reversed when seen in the teleprompter! This has no impact on your audience but it’ll be plenty distracting and confusing for you if you’re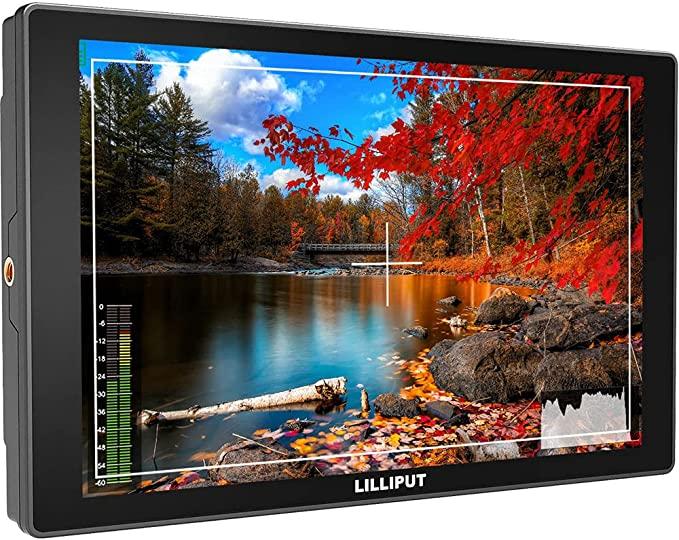 using a screen with a standard output. That’s why I recommend you use a small monitor with a critical feature: the ability to display a reversed image that will appear “normal” when viewed on the teleprompter.
I know the one I use and recommend here is expensive for just a 10” monitor but I did the research and found no better option. Sorry folks. You wanted a killer setup right?!?
Teleprompter monitor: LILLIPUT A11 10.1″ 4K (US$350)

Elgato Light Strip (US$40) – this is totally optional but this configurable light strip creates a nice accent color and visual interest in your shot. You’ll see it in all my studio videos behind me. And yes, everything about it from the color to the brightness to the power can be controlled using your Streamdeck!

Light strip with blue effect in the background.
Laptop – finally we come to the last part; the computer you plug everything into to run it all! When I first ran this setup I was using a 1-year-old Intel-based Macbook pro. It was relatively new and powerful but struggled to support all the technology, inputs, and dongles without having the fan spin up and create an audio distraction every time. I gave that machine to my wife and bought a 2022 16” Macbook Pro with an M1 Pro chip. That thing is a beast, runs the whole works seamlessly and I have NEVER heard the fan come on even once. Feel free to use whatever machine you have to start and know that by the time you’re reading this, there are probably plenty more options on the market that are more powerful than what I have (but you won’t regret going for a Mac with Apple silicon).
Want to see how all this tech comes together in living color? Check out the video below!
We promise never to send you junk or share your email! Just helpful sales insights.