I've been sorting data in Excel for years, even before I joined HubSpot in 2011. And considering that content marketing tools often exported unordered data without a logical order, it's safe to say I know a thing or seven about keeping data tidy in Excel.

While Excel and its data-sorting methods have improved over the years, using it can still prove overwhelming to some. ![Download 10 Excel Templates for Marketers [Free Kit]](https://no-cache.hubspot.com/cta/default/53/9ff7a4fe-5293-496c-acca-566bc6e73f42.png)
But don't let Excel intimidate you. Excel is powerful, and its sorting function can simplify your data-sorting workflow. Let me walk you through the different ways you can sort in Excel so you can start using Excel like a pro.
Table of Contents
- How To Sort in Excel
- Productivity Tip: Use Sort A to Z and Sort Z to A Buttons
- Sorting Multiple Columns
- Sorting in Custom Order
- Sorting a Row
- Sorting Using Conditional Formatting
- Sorting by Partial Values
- Sorting a Range Within a Larger Range
How To Sort in Excel
As a professional spreadsheet software, Excel offers several ways to sort data. You can use “Sort,” add a “Filter,” or turn your dataset into a “Table.”
While all of these features let you organize your data, I prefer using the “Sort” tool because it sorts the data without adding any extra elements.
I’ll be using Microsoft Excel 365 for Windows in this guide, but the steps will be similar for previous Office versions and Microsoft Excel for Mac.
.png)
Free Excel Marketing Templates
10 free templates to help you master marketing with Excel.
- Marketing Reporting Template
- Email Planning Template
- SEO Template
- And More!
1. Highlight the rows and/or columns you want to be sorted.
To sort a range of cells in Excel, click and drag your cursor across your spreadsheet to highlight all the cells you want to sort — even those rows and columns whose values you're not sorting.
Excel usually detects the datasets I want to sort even if I don’t do this and just select a cell inside the dataset. Still, I prefer doing it this way to have more control over the data I’m sorting since I’ve seen Excel include extra rows or columns that weren’t part of the original dataset.
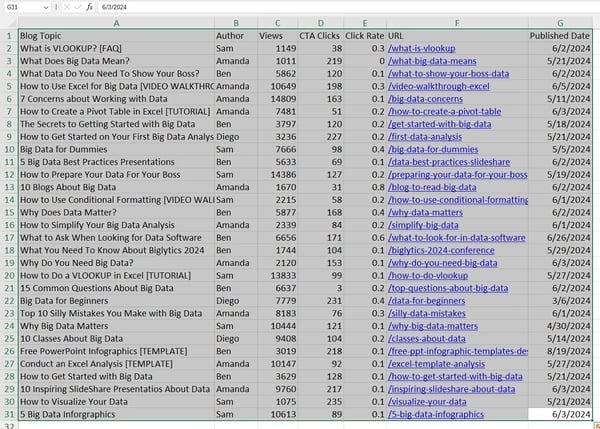
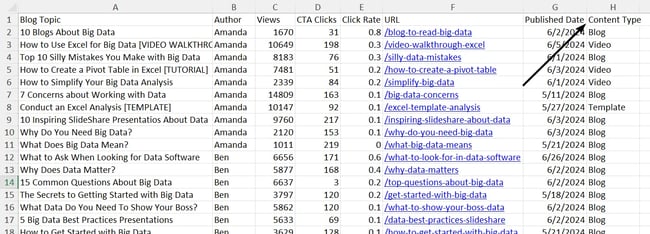
Note the screenshot below. While I intend to sort this sheet by click rate to see how each blog topic is performing, I'm highlighting the other columns so every other detail about the blog topics matches the click rate entry that gets sorted. Otherwise, there could be a mismatch between columns when I finish sorting.
2. Navigate to data along the top and select Sort.
Once you’ve highlighted all the data you want to sort, select the “Data” tab along the top navigation bar.
This tab will expand a new set of options beneath it, where you can select the “Sort” button. The icon has an “A-Z” graphic, as you can see below, but you can sort it in more ways than just alphabetically.

3. If sorting by column, select the column you want to order your sheet by.
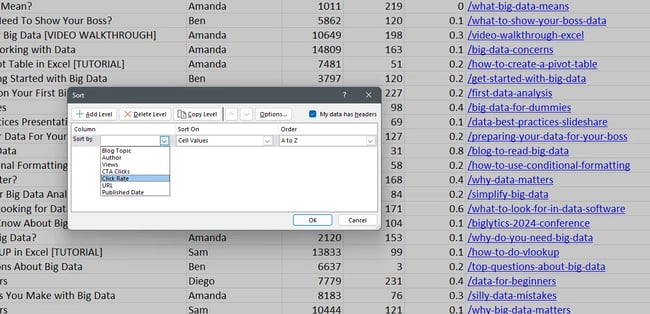
A setting window will appear once you hit the “Sort” button. This is where you can configure what you‘d like sorted and how you’d like to sort it.
If you're sorting by a specific column, click the leftmost dropdown menu — shown below “Column” — and select the column whose values you want to be your sorting criteria. In my example, it'll be Click Rate.
4. If sorting by row, click Options and select Sort left to right.
If you'd rather sort by a specific row than a column, click “Options” at the top of the window and select “Sort left to right.” (If you’re on a Mac, you’ll find this button at the bottom of the window.)
Once you do this, the Sort settings window will reset and ask you to choose the specific row you'd like to sort by in the leftmost dropdown (where it currently says “column").
This sorting system doesn‘t quite make sense for my example, so we’ll stick with sorting by the Click Rate column.
5. Choose what you’d like sorted.
You can sort cells by more than their value.
In the middle column of your Sort settings window, you'll see a dropdown menu called “Sort On.”
Click it, and you can choose to sort your sheet by different characteristics of each cell in the column/row you're sorting by. These options include cell color, font color, or any icon included in the cell.
I often lean on “Sort On” to sort project tasks by their statuses — completed, pending, or overdue. That lets me see overdue tasks at the top. I’ll dig deeper into that further below.
6. Choose how you’d like to order your sheet.
In the third section of your Sort settings window, you'll see a dropdown bar called “Order.” Click it to select how you'd like to order your spreadsheet.
By default, your Sort settings windows will suggest sorting depending on the column content. If the column contains numbers, it’ll suggest “Smallest to Largest.” But if you choose a column with letter-based values, it’ll suggest “A to Z.”

As I’m sorting by Click Rate, I get “Smallest to Largest.” But since I want to see highly performing blogs at the top, I’ll change the order to “Largest to Smallest.”

If the default options don’t fit your data, you can also use “Custom List.” I’ll discuss how and why you might sort by custom list further below.
7. Click OK.
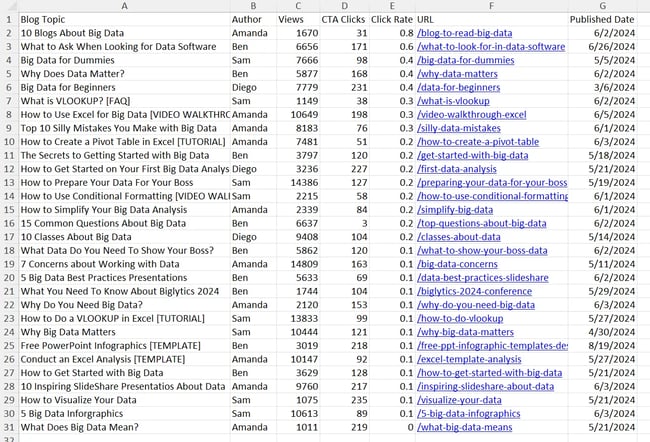
Click OK in your Sort settings window, and you should see your list successfully sorted according to your desired criteria.
For instance, here’s what my sorted data looks like:
Productivity Tip: Use Sort A to Z and Sort Z to A Buttons
While I use the Sort settings window to organize complicated data, I often default to using the “Sort A to Z” and “Sort Z to A” buttons when I’m working with smaller datasets, such as a list of fewer than 20 entries with 2-5 columns (e.g., a list of monthly blogs).
To use “Sort A to Z” and “Sort Z to A”:
- Select a cell in the column you want to sort.
- Click on the “Data” tab in your toolbar.
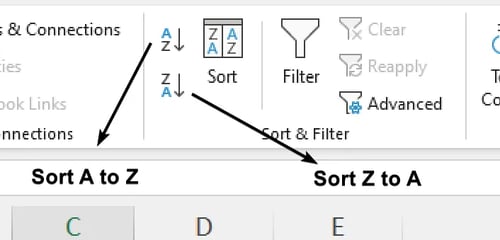
- Click “Sort A to Z” if you want to sort in alphabetical order or ascending order. Alternatively, click “Sort Z to A” if you want to sort in a reverse alphabetical order or in descending order.
Free Excel Marketing Templates
10 free templates to help you master marketing with Excel.
- Marketing Reporting Template
- Email Planning Template
- SEO Template
- And More!
When working with data surrounding content performance, I love using these two options to get valuable insights, such as converting blog pieces, high-traffic blogs, and unoptimized content topics.

Sorting Multiple Columns
What if you want to sort more than one column?
For instance, I want to organize my blog topics by their authors and then by the click rate to see how each author fared.
Here’s how I’ll do it.
- Click on the data in the column to sort.
- Click on the “Data” tab in the toolbar.
- Open the “Sort” options.
- Change the “Column” dropdown to the column I want to sort. (In my example, I’ll change it to Author.)
- Click “Add Level” at the top left of the pop-up, which will add a “Then by” row to the Sort settings window.
- Use the dropdown list in front of “Then by” to select the second column I want to sort by. (In my case, I’ll change it to Click Rate.)
- Check the “Order” column to ensure it shows the order I want to see my data in (alphabetically for authors and largest to smallest for click rates) and click “OK.”

Note: If your data has headers, ensure “My data has headers” is ticked.
Sorting in Custom Order
Sometimes, you want to avoid sorting by A to Z or Z to A and instead sort by something else, such as months, days of the week, or some other organizational system.
In situations like this, you can create your custom order to specify precisely the sort you want.
For instance, since templates and infographics are sales assets, I often sort content pieces by their type to see how the different content types performed — I’ve added a column for Content Type to do this.
To sort in custom order:
- Click on the data in the column you want to sort.
- Click on the “Data” tab in your toolbar.
- Click on the “Sort” button.
- Change the “Column” dropdown to the column you want to sort. I’ll use Content Type.
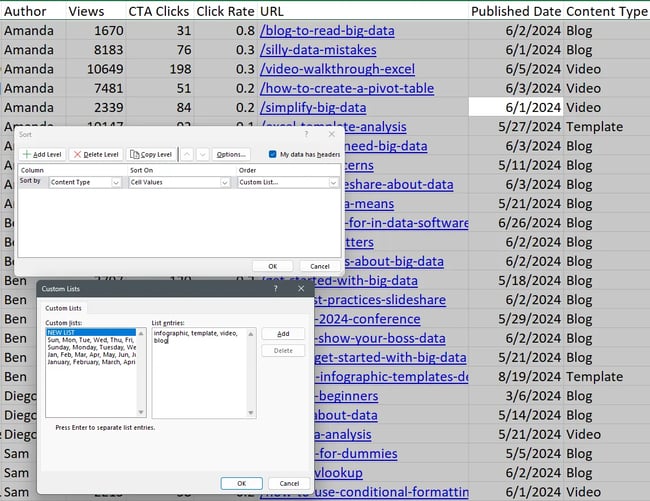
- In the “Order” column, click the dropdown list and select “Custom List.”
- If you’re sorting by month or day, use the predefined lists to sort your data. Otherwise, add your own values. For instance, I went for “infographic, template, video, blog.”
- Click “Add” to add the custom list, and click “OK.”
- In the “Sort” settings window, Click “OK” to sort the data.
Sorting a Row
Sometimes, your data may appear in rows instead of columns. You can still sort your data by using a slightly different step when that happens. While rare, this feature has proven useful whenever I was dealing with monthly figures and wanted to quickly see how we did in different months.
Free Excel Marketing Templates
10 free templates to help you master marketing with Excel.
- Marketing Reporting Template
- Email Planning Template
- SEO Template
- And More!
To sort a row:
- Click on the data in the row you want to sort.
- Click on the “Data” tab in your toolbar.
- Click on the “Sort” button.
- Open “Options” at the top of the window (located at the bottom of the window if you’re on a Mac).
- Under “Orientation,” select “Sort left to right.” Then, click “OK.”
- In the “Row” column, select the row number you want to sort from the dropdown. (I’m going with Row 5 to sort by total sales.) When you are done, click “OK.”
Sorting Using Conditional Formatting
If you use conditional formatting to change the color of a cell, add an icon, or change the font color, you can sort by that, too.
When I was a Product Marketing Manager at HubSpot, I relied on conditional formatting and sorting to see if any of the content pieces were overdue and required my attention.
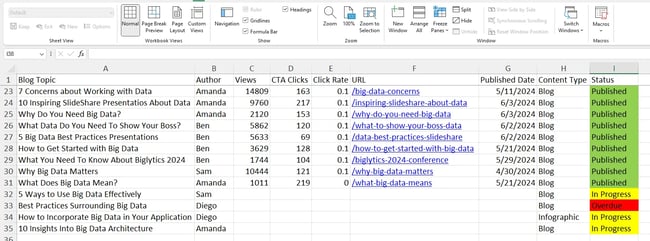
To show how it works, I’ve added another column and four new blog topics to the sample data.
To sort using conditional formatting:
- Click on the data in the row you want to sort.
- Click on the “Data” tab in your toolbar.
- Click on the “Sort” button.
- Under “Column,” select the column you want to sort. In my case, it’s Status.
- In the “Sort On”, select “Cell Color.”
- In the “Order column,” select the red bar.
- Click on “Add level.” Repeat steps 4-6, and instead of selecting the red bar, select the yellow bar.
- Click on “Add level.” Repeat steps 4-6, and instead of selecting the red bar, select the green bar.
- Click “OK.”

Sorting by Partial Values
While normal sorting gets the job done most of the time, you may encounter data where you want to sort the partial value of a column. For instance, you may want to sort a customer list by last name where you have data in the form of “First Name Last Name” (as in Rachel Leist).
I ran into that issue in the past whenever I tried to study the competing domains that had date data in their URLs. Instead of sorting the URLs in alphabetical order, Excel would sort the URLs using their date information — as the prior section of the URL stays the same.
To bypass the issue, I divide the column with partial values into multiple columns. Then, I sort the column with the desired value to get the required data.
Here’s how you can sort by partial values:
- Highlight the cells containing the relevant data.
- Click on the “Data” tab in your toolbar.
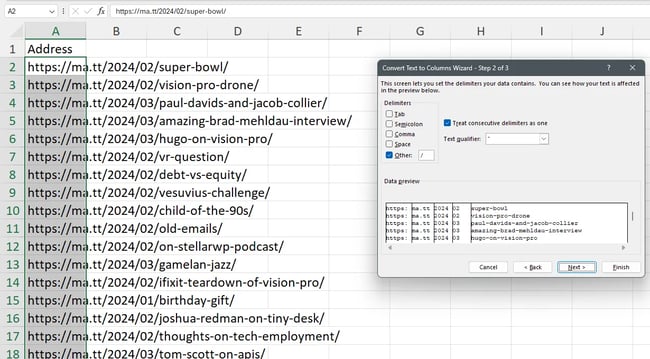
- Click “Text to Columns.”
- Select delimited if data is divided by commas, dashes, a space, or any symbols.
- Tick the delimiters that apply and add specific symbols in Other if required. In my case, as I’m dealing with a URL, I added a forward slash (/) as a delimiter.
- Once you have the partial value untangled, you can use “Sort A to Z” to “Sort Z to A” to sort the data quickly. Alternatively, you can use the sort dialog box to configure a sort order.

If you’re looking for more tricks like using Text to Columns, check out our Microsoft Excel guide for beginners.
Sorting a Range Within a Larger Range
If you’re looking to temporarily manipulate the data and want to explore different insights, you can also sort a subset of the data by sorting inside the larger range.
To sort a range within a larger range:
- Highlight the subset of the data you want to sort.
- Click on the “Data” tab in your toolbar.
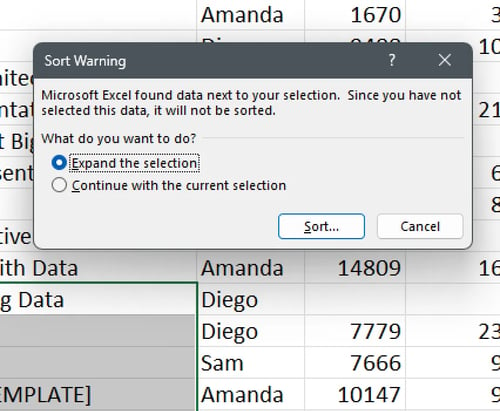
- Use “Sort A to Z” to “Sort Z to A” to sort data. You’ll see a “Sort Warning” notifying you that MS Excel found larger data near your selection.
- Select “Continue with the current selection” and click “Sort.”
While sorting a range with a larger range gives you a flexible way to temporarily tweak the dataset, I don’t recommend using it on your main document — or at least that’s what my not-so-tiny data disasters have taught me.
You have to restore to a previous version to eliminate data errors if you lose track of the previous arrangement. Learn from my mistakes and create a spare copy of the main dataset to avoid losing your work. Or, if these specific insights are crucial to your project, add filters to hide/unhide entries without affecting the underlying data.
Common Issues Surrounding Sorting in Excel
While I’ve shared my tried and tested tips to get you through sorting error-free, mistakes can happen. So, here are a few issues I’ve faced myself or seen others struggle with:
- Incomplete sorting. Excel ignores the hidden rows and columns during sorting. So, if you unhide the row or column after sorting, you might see incomplete sorting.
- Headers get sorted. If one of the header cells has no text, Excel will consider that header row as data by default. So, if your headers get sorted, check if one of the header cells is empty.
- Data changes after sorting. Excel recalculates the formulas after sorting. If your dataset relies on random number generation, you’ll face data changes after sorting. Typically, you can avoid that by replacing the RAND function entries with the output values.
There you have it — I’ve listed all the possible ways to sort in Excel.
Ready to put your sorting skills to use? Grab one of the Excel templates below and organize your data as you see fit.


![How to Use VLOOKUP Function in Microsoft Excel [+ Video Tutorial]](https://blog.hubspot.com/hubfs/VLOOKUP-hero.webp)